
Iron-on patches are among the simplest and least expensive methods to add flair to your rucksack, personalize a denim jacket or represent your sports team. The finest aspect? All you need is an iron, a level surface, and a little knowledge; you don’t need to be a seamstress or possess any sophisticated tools.
We’ll go over how to iron on patches like a pro, which materials work best, how to take care of your patched clothing, and when it might be time to switch to a heat press in this comprehensive guide. Custom patch makers offers premium custom iron-on patches if you’re in Canada.
What Are Iron-On Patches?
Fabric embellishments with a heat-activated adhesive backing are called iron-on patches. The glue melts and securely attaches the patch to the fabric when heat is applied, usually with an iron or heat press. They can be applied to nearly any fabric surface and are available in a wide range of forms, including as woven, embroidered, PVC, and full-color printed patches.
Iron-on patches are often used for:
- Customizing apparel and accessories
- Uniform branding for businesses and sports teams
- Fixing minor holes or damaged spots in clothing
- Adding embellishments to hats, purses, and jackets
What You’ll Need Before You Start
Prior to starting the application procedure, collect the following:
- Your patch that is ironed on
- The item of clothing or fabric that you wish to use it on
- A typical domestic iron
- A flat, heat-resistant surface or ironing board
- A thin pillowcase or pressing cloth
- Heat-resistant or thermal tape (optional but advised)
Preparing things ahead of time facilitates the process and lowers the possibility of mistakes.
Step-by-Step Guide: How to Iron On Patches
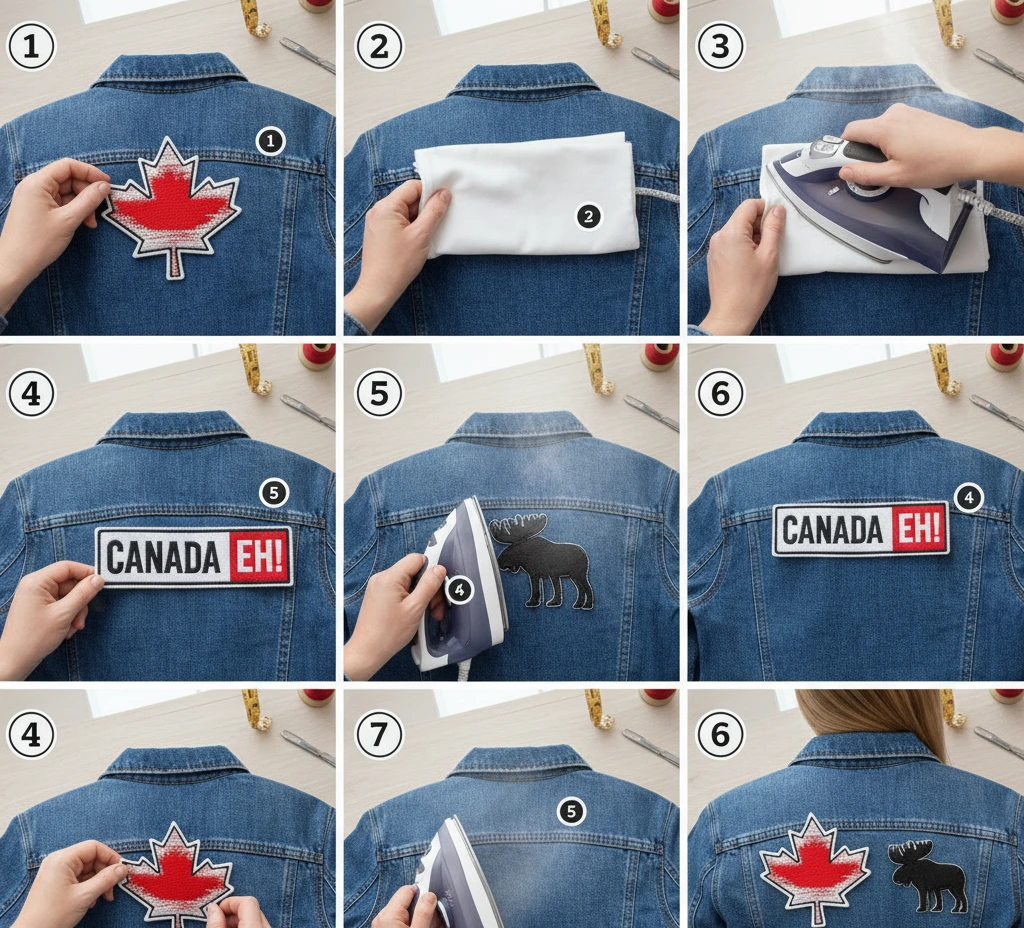
Step 1 — Wash and Prepare Your Garment
Make sure your clothing is clean and clear of dust, grime, and fabric softener residue before placing any patches. These materials have the potential to disrupt the adhesive binding. Before continuing, let the item completely dry if it was just washed.
After cleaning, place the item of clothing flat on your ironing board. All creases and wrinkles should be completely smoothed out. Take your time with this step since even little wrinkles can prevent the patch from sticking evenly.
Step 2 — Position Your Patch
Place your patch face-up on the garment after deciding exactly where you want it to sit. Before proceeding, make sure it is exactly aligned the way you want it. Take a step back and observe it from a distance if you’re not sure.
Use a thin strip of thermal tape to secure the patch so it won’t move while being pressed. Larger patches or patches applied to curved areas like sleeves or shoulders benefit greatly from this.
Step 3 — Set the Right Iron Temperature
To find the highest safe ironing temperature, check the care label on your clothing. A medium-to-high heat setting is ideal for the majority of cotton and polyester blends. Steam should not be used during this procedure since moisture can affect the glue.
To ensure that heat-sensitive fabrics, such as nylon or other synthetic blends, won’t be harmed, lower the iron’s temperature and start with a small test area.
Step 4 — Apply Heat from the Back
After positioning and fastening your patch, turn the garment inside out so that the patch is on the ironing board face down. Over the back of the garment, place your pressing cloth or thin pillowcase exactly where the patch is located.
For 20 to 25 seconds, apply a strong pressure without moving the iron back and forth. In contrast to standard ironing, you need steady stationary pressure to ensure a good adhesive bond. If the patch exceeds the iron’s surface area, raise the iron, move it slightly, and push once more.
Step 5 — Let It Cool and Check the Bond
Give the clothing and patch at least 30 to 60 seconds to cool fully after pressing. Many folks overlook this crucial step. It takes time for the glue to harden and create a strong connection with the fabric’s fibres.
To test the binding, lightly pull the patch’s edges once it has cooled. Repeat the pressing procedure with a little more firm pressure if any corners are lifting.
When the patch has completely cooled, carefully remove the thermal tape.
How to Iron On Patches on Thick Fabrics
A slightly different strategy is needed for thick materials like canvas bags, hoodies, and denim coats. A typical iron pressed from the top might not produce adequate bond since the heat must pass through more material to reach the adhesive backing.
The key for thick fabrics is as follows:
Instead of applying pressure from the back of the garment over the patch, completely turn the garment inside out. Press the iron on the rear of the patch’s location on the exterior of the garment by applying it from the inside. For around 40 seconds, apply hard, consistent pressure. By using this reverse ironing method, the heat can pass through less material before reaching the glue, strengthening the bond considerably.
A heat press is highly suggested for large orders or really thick textiles. A home iron just cannot match the uniform, even pressure and warmth that heat presses provide throughout the whole patch at once. Whether you’re using a home iron or a professional press, all of the custom patches at custom patch makers are made with ease of application in mind.
Which Fabrics Work Best for Iron-On Patches?
When it comes to iron-on patches, not all textiles are made equal. Here’s a little explanation:
The best materials for iron-on patches:
- Cotton: It binds effectively and absorbs heat evenly.
- Denim holds patches firmly and is perfect for jackets and jeans.
- Canvas is excellent for heavy-duty applications including bags.
- Blends of polyester often function well at medium temperatures.
Textiles to be cautious around:
- Nylon should only be used on low heat settings as it may melt or deform.
- Waterproof textiles: the coating can stop glue from sticking.
- Heat can harm the surface of leather and imitation leather, so stitching is usually chosen.
- Extremely delicate or thin materials: excessive heat can harm them
When in doubt, check the garment’s care label or try on a tiny, discrete area first.
Iron vs. Heat Press: What’s the Difference?
For sporadic, one-time patch applications at home, a household iron works just fine. However, a heat press has significant benefits if you’re putting patches to several items of clothing, such as staff uniforms or sports team jerseys:
- uniform pressure over the whole surface of the patch
- steady temperature with no hot areas
- Quicker application for large orders
- Stronger, longer-lasting bond overall
An iron is a great tool for the majority of daily tasks. However, purchasing a heat press or working with a reputable source like custom patch makers is well worth it if you want to purchase custom patches in Canada for your company, team, or organization.
How to Care for Garments with Iron-On Patches
The longevity of your iron-on patches is greatly increased by proper upkeep. To keep your patches looking great wash after wash, adhere to these easy tips:
To lessen friction and safeguard the patch surface, wash from the inside out.
To keep the fabric and glue intact, use cold water.
Select a mild cycle for your washing machine.
Steer clear of chlorine and aggressive detergents as they can eventually deteriorate the adhesive.
When at all possible, air dry; high dryer heat can eventually weaken the connection.
Iron-on patches on clothing should not be dry cleaned unless they are also stitched down.
High-quality iron-on patches can easily endure 20 or more washes without losing their vibrancy or connection when properly cared for.
Pro Tip: Sew Down the Edges for Extra Durability
Consider stitching around the edges of the patch after ironing it on if you want optimum longevity, particularly for patches on work uniforms, motorcycle vests, or children’s clothing that is used frequently. Even after many washings, a straightforward straight stitch or backstitch around the edge strengthens the adhesive bond and keeps it from flaking.
For professional and industrial applications, this combination of iron-on adhesive and edge stitching is the most resilient application technique.
Frequently Asked Questions (FAQ)
Is it possible to iron patches without an ironing board?
Indeed! Any flat, heat-resistant surface, such a folded towel on a table, can be used. Just make sure the surface won’t be harmed by heat and is stable.
What is the lifespan of iron-on patches?
Iron-on patches usually last 20 to 30 washes if applied and maintained properly. After ironing, sewing down the edges can greatly increase their longevity.
Is it possible to remove iron-on patches?
Yes, they can be eliminated by gently peeling and applying heat. While the glue is still heated, apply heat to the patch area and gradually remove the patch. Rubbing alcohol can be used to eliminate any residue that might still be present.
Do iron-on patches fit every type of fabric?
The majority of fabric types function effectively, however materials that are wet or heat-sensitive can be challenging. Always start by testing on a small area and reading the care label.
Where in Canada can I get personalised iron-on patches?
At custompatchmakers.ca, you can purchase premium custom iron-on patches made in Canada. They provide a wide variety of styles with quick Canadian shipping, whether you need patches for uniforms, events, products, or personal usage.
For patches, is it preferable to use a heat press or an iron?
An iron is perfect for single clothing and at-home use. Because of its constant heat and pressure, a heat press is a preferable option for large orders or professional-grade output.
Final Thoughts
Anyone can become proficient at applying iron-on patches with the correct techniques and a little perseverance. For a clean, long-lasting outcome, every step counts, from preparing your cloth to cooling the bond and taking care of your patched garment.
Iron-on patches are a flexible, affordable option whether you’re branding work wear for your company in Vancouver, outfitting a hockey team in Ontario, or personalizing a jacket for personal style. Additionally, custompatchmakers.ca is the reliable option for quality, variety, and prompt delivery when you need custom patches created in Canada.
Are you prepared to begin? Create your own iron-on patches now to give your clothes the makeover they deserve.