
Custom embroidered patches are a great way to tell your brand stories through creative embroidery designs. Represent your identity with stylish and durable threaded embroidered patches. You can apply unique embroidery patch designs on your uniforms, school bags and hats.
In this guide, we will break down the do’s and don’ts of customizing embroidered patches to make them look good. This way, you end up designing eye-catching customer embroidered patches for all your clothing.
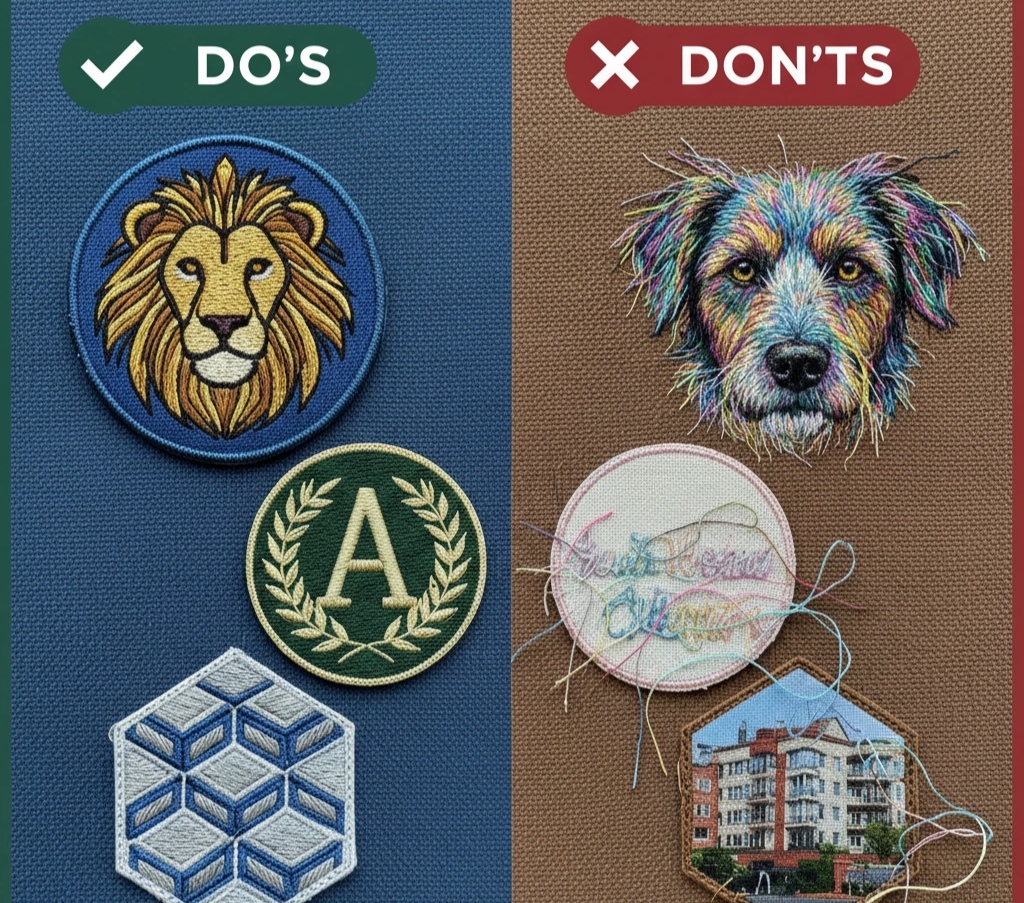
What Makes a Great Custom Embroidered Patch?
A great custom embroidered patch should be simple, use vibrant colors and fits in right size with durable material. You can design embroidery designs through bold fonts, stunning contrast with sharp edges that capture attention in seconds.
Many industries, like corporate, sports, fashion and street wear brands, rely on custom embroidery patches. People love embroidery designs because of their strong threads, durable backing and quality material that lasts longer.
Dos of Creating Custom Embroidered Patches
Here are some key things you can do while designing personalized embroidered patches:
Keep the Design Simple and Clear
Don’t think simple designs are boring; instead, they capture more eyes. Too many detailed embroidered patches usually do not offer stitch clarity. Go for clean shapes, minimal elements and bold fonts or artworks while designing embroidery patches. Because a minimalistic design for an embroidery patch offers:
- Easier for machines to stitch accurately
- Improves readability from a distance
- Creates a stronger visual identity
- Use High-Contrast Color Combinations
- Color choice directly affects visibility.
The colors you choose for embroidered patches decide whether the design is visible or not. That’s why be careful while picking contrasting shades for fonts, background and patch borders. You can either put light colors on dark ones and dark colors on light ones for better combinations. You can do this:
- Stick to 2–4 colors for most designs
- Use bold thread colors for emphasis
- Test visibility on different fabrics
- Choose Bold, Readable Fonts
To capture attention in seconds, you need the best typography for your custom embroidered patches. You might love those thin and too detailed fonts on the screen, but in real you cannot even see them clearly. The right choice for typography is to go with bold fonts.
Pro Tip: Make sure the size of text is medium or large, not too small, because tiny fonts disappear under stitches more easily.
Consider Size and Placement Early
Pretty embroidery patch design looks waste of money when you apply them on wrong spot. You need comparatively small embroidered patches for hats or sleeves than for the chest or back of fabrics. Keep the placement in your mind while selecting the size of embroidered patches:
- Minimum 2–3 inches for readable text
- Larger patches allow more detail
- Match size to garment area
- Add a Defined Border
Borders for embroidery patches not only add more value to the design, but they also protect the patch over time. Most embroidery manufacturers prefer marrowed or stitched borders for durability and longevity. The benefits of selecting the right type of embroidered patch edges include:
- Improves durability
- Enhances visual separation
- Makes application easier
- Work with Experienced Patch Makers
If you have a great idea in your head about designing the embroidered patch, then don’t rely on cheap patch makers. Instead, hire expert embroidered patch manufacturers that understand your requirements. Discuss what type of embroidered patch you want, choose stitch density, backing, colors, thread type and material for the embroider patch.
Don’ts of Creating Custom Embroidered Patches
It’s time to learn what things you need to avoid while designing your custom embroidered patches:
Don’t Overcomplicate the Design
Too many details and adding multiple elements in a single embroidered patch mostly backfire. Fine details, multiple gradients and too much texture never mean the patch design is perfect. In fact, you end up creating clutter and reducing the clarity of the designs. You need to avoid things like:
- Tiny intricate patterns
- Overlapping elements
- Excessive text
- Don’t Use Too Many Similar Colors
Choosing the low contrast for your embroidery patch creates a poor impact on the viewers. Never choose close tone colors to avoid confusion in the designs. You cannot differentiate the text and background with similar tone colors.
Example mistake: Dark blue text on a black background.
Don’t Choose Thin or Delicate Fonts
When you customize your embroidered patch with thin lining and fonts, it suddenly merge with the background. As a result, the design is not visible anymore and becomes faded after the first wash. You end up struggling with readability, especially if the embroidered patch is too small.
Don’t Go Too Small
You cannot do much with tiny embroidered patches. That’s why try to choose a medium or large size base for better stitch density. Meanwhile, you don’t get much clarity, details or add multiple texts in small embroidery patches.
Reality check: If your message can’t be read at a glance, the patch isn’t doing its job.
Don’t Skip Testing and Sampling
Jumping straight to production after you confirm the patch design on screen is a big mistake sometimes. That’s why you need to ask for a sample of the final embroidery patch to verify the design clearly.
Comparison: Good vs Poor Patch Design
- Element
- Good Design
- Poor Design
- Complexity
- Simple, clean layout
- Overcrowded, detailed
- Colors
- High contrast, limited palette
- Too many or similar shades
- Font
- Bold and readable
- Thin, decorative
- Size
- Appropriate for placement
- Too small or oversized
- Border
- Defined and structured
- No border or weak edges
- Durability
- Strong stitching and materials
- Prone to fraying or fading
Practical Tips for Smart Embroidered Patch Customization
Follow these expert suggestions if you want to create embroidered patches that stand out and capture attention at first glance:
Decide the purpose of designing an embroidered patch, whether you want to do branding, casual wear or apply them on uniforms.
Use professional embroidery design softwares, don’t design the patch for printing.
Test your design on actual fabric.
Balance creativity with practicality.
Final Thoughts
You have to turn on both a technical and artistic mindset while customizing embroidered patches. Do proper research while selecting the backing, patch material, stitch density and color combination for embroidery patches. Don’t rely on screen designs; order a sample to verify the final design and never select boring colors.
Get in Touch
for high-quality custom embroidered patches in Canada. Visit Custom Patch Makers Canada today.